Draw a Horse Hoof the Easy Way
Once You Master the Hoof the Rest of the Horse Comes Easy
People often get ‘hung up’ on hoofs when they draw a horse. The trick to drawing horse hoofs is to make it simple, so that’s what we’re going to do. Once you understand a little about horse hoof anatomy, you’ll find drawing them much easier!
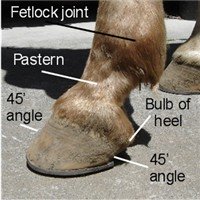
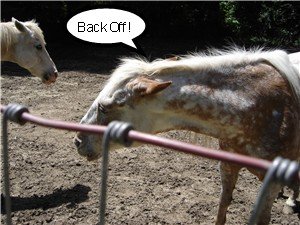
Take a look at this horse hoof photo. One of the first things you will notice is the large round fetlock joint above the hoof. Below that is the horse's ankle or pastern. The hoof walls sit at a 45 degree angle from the side view.
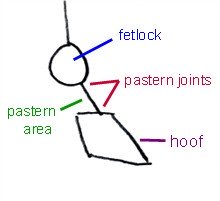
Looking at the illustration you can see the joints. The large fetlock joint and the two ends of the pastern. These three joints allow the horse to point and bend those ‘toes’ at graceful angles.
Draw a Horse – Hoofs Simplified
5 More Horse Drawing Lessons
Broken down into simplified parts you can see how the hoof is designed to move. I like to use a circle to represent the fetlock joint. Use a straight line to represent the pastern and a parallelogram to represent the hoof itself. It's so easy...anyone can do it.
This basic skeleton that will act as a guide from which to draw your hoof around. This is the time to play with angles. Get the angles right with your skeleton drawing and the correct hoof angles will follow.

Draw a Horse Hoof Side View
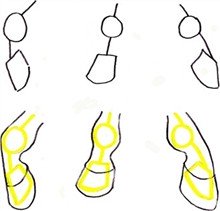
When a horse is standing still on all four feet, the front and back walls of the hoof are about a 45º angle. So is the pastern just above the hoof. The fetlock joint will set back slightly behind the back of the hoof.
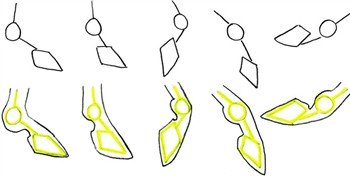
When you are drawing horses in side view with the legs bent in action; the angle on the pastern and fetlock joints will change, but the shape of the hoof itself will not! Take a look at these side view illustrations.
After you have drawn the final hoof around your stick figure, erase the skeleton guidelines.
Tip: Draw lightly and erase as often as needed. Darken your final drawing later.

Draw a Horse Hoof Front View
Standing Toe up Pastern flexed Toe back
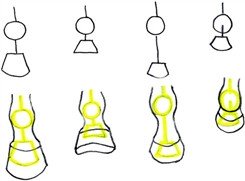
The horse hoof will take on a whole new shape when viewed from the front. Create a simple skeleton with a circle for the fetlock, a line for the pastern and a squarish shape for the hoof. Notice the pastern is slender compared to the fetlock joint and the hoof.
The length of the pastern will change as the horse points his hoof front or back. Foreshortening is a fancy term meaning it appears shorter. Forelengthening means it appears longer from that angle.
Notice when the hoof is thrown forward and up; the pastern is shortened and you can start to see the underside of the hoof. You'll see more of the pastern and less hoof when the toe is starting to point backward. When the front foot is very flexed, the pastern nearly disappears. Erase as often as needed. A little practice goes a long way.

Draw a Horse Hoof Back and Bottom View
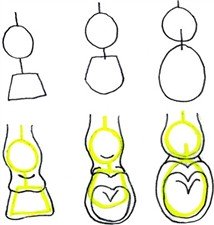
When drawing a horse hoof from behind the same rules apply. Start with a stick figure. From the back, the bulbs of the heel will be visible. Depending on the angle, you may see less of the hoof wall, and alot more of the underside.
When you are drawing the underside of the hoof use a circular shape to represent the hoof instead of a squarish shape.

Draw a Horse Hoof 3/4 View
Notice the hoof shape of the stick figure becomes rounded at the bottom with a 3/4 angle. In your finished drawing, a curved line at the top of the hoof will almost parallel the bottom of the hoof.
To Get the Most From This Lesson:
Practice drawing these front, side, back and 3/4 views of the hoof. Fill a page or two with practice hoofs until you have mastered them. Use these simple skeleton drawings to get you started.
Learning to draw horse hoofs is simple when you break it down. Once you know how to draw the hoof at various angles, you will have the freedom to draw horses in all kinds of poses, and that’s where it gets really fun. Practice, practice, practice drawing hoofs and soon you’ll have horses dancing all over the place!
More Articles to Help Draw Horses:
Horse Hoof Anatomy
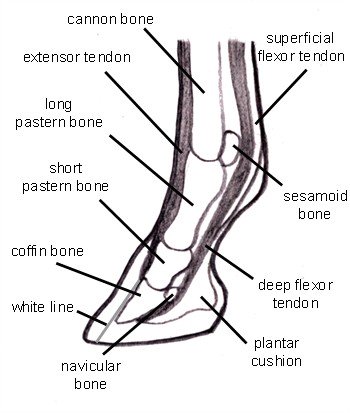
See horse hoof anatomy inside and out for a better understanding of your horse's feet.
Home > How To Draw A Horse > Draw a Horse Hoof
